Spring Boot, Mongo and Docker. Run all with a single command.

In this article, we’ll se how to run a spring boot application with mongo db and a mongo client with a single command. For this purpose, we must dockerize our application, the mongo database and the mongo client.

Spring Boot Application

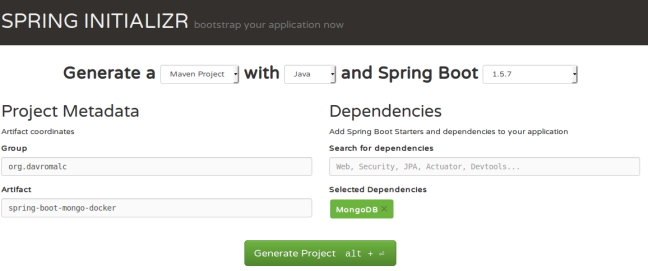
To create our Spring Boot application we use the project creation wizard provided by the Spring web.

SpringInitializr

Once the project is downloaded, we need to add the necessary configuration to dockerize the application and for the application to connect to Mongo.

How to dockerize the application.

We only need to add a plugin to the pom.xml file and our application will aready been dockerized.


<plugin>
  <groupId>com.spotify</groupId>
  <artifactId>dockerfile-maven-plugin</artifactId>
  <version>1.3.4</version>
  <configuration>
    <repository>${docker.image.prefix}/${project.artifactId}&nbsp; </repository>
  </configuration>
  <executions>
    <execution>
      <id>default</id>
      <phase>install</phase>
      <goals>
        <goal>build</goal>
      </goals>
    </execution>
  </executions>
</plugin>
 

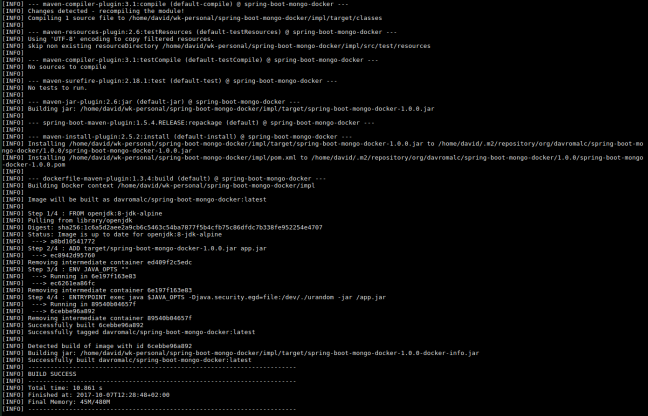
If we run mvn clean install we will see how our image has been created successfully.

MvnCleanInstall

How to connect our app to mongo db

First of all, we need to  add application.yml file. This file contains all configuration needed for our application.

spring.data.mongodb:
   database: customers # Database name.
   uri: mongodb://mongo:27017 # Mongo database URI. Cannot be set with host, port and credentials.

One of the first questions that would fit me would be:
Why does mongo appear as a host instead of localhost?

For one reason:

If we put localhost and run our application with docker, the mongo database won’t be founded. Mongo will be located in a container and our app will be located in a different container.

However, If we run our application with java, we only have to add following line to our /etc/hosts file.

mongo           127.0.0.1

Once the connection to mongo is configured, we need to add a repository to allow query database.

import org.davromalc.tutorial.model.Customer;
import org.springframework.data.mongodb.repository.MongoRepository;

public interface CustomerRepository extends MongoRepository<Customer, String> {

}

Also, we need to enable mongo repositories in our main spring boot class.

import org.springframework.boot.SpringApplication;
import org.springframework.boot.autoconfigure.SpringBootApplication;
import org.springframework.data.mongodb.repository.config.EnableMongoRepositories;

@EnableMongoRepositories
@SpringBootApplication
public class Application {
   public static void main(String[] args) {
      SpringApplication.run(Application.class, args);
   }
}

Additionally, we can add a controller that returns all the data, in json format, from mongo or to be able to persist new data.

import java.util.List;

import org.davromalc.tutorial.model.Customer;
import org.davromalc.tutorial.repository.CustomerRepository;
import org.springframework.beans.factory.annotation.Autowired;
import org.springframework.web.bind.annotation.RequestBody;
import org.springframework.web.bind.annotation.RequestMapping;
import org.springframework.web.bind.annotation.RequestMethod;
import org.springframework.web.bind.annotation.RestController;

import lombok.extern.slf4j.Slf4j;

@RestController
@Slf4j
public class CustomerRestController {

   @Autowired
   private CustomerRepository repository;

   @RequestMapping("customer/")
   public List findAll(){
      final List customers = repository.findAll();
      log.info("Fetching customers from database {}" , customers);
      return customers;
   }
@RequestMapping(value = "customer/" , method = RequestMethod.POST)
   public void save(@RequestBody Customer customer){
      log.info("Storing customer in database {}", customer);
      repository.save(customer);
   }
}

Our application is fine. We only have to create a docker image to be able to run a container with our application.

mvn clean install

Once the docker image is created, we can list all docker images and check if the docker image was created successfully.

DockerImageCreatedSuccessfully2

Besides, we can run a container from the image created

AppSuccessfullyRuned

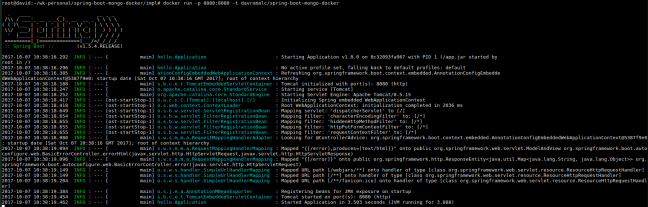
At this point, we have our application dockerized but it cannot connect to mongo and we can’t see mongo data.

Mongo import

So that we can have data every time we start our mongo db, I have developed a script that persists in mongo the json files that we enter inside the folder mongo-init.

The script does the following:

  1. For each folder inside the data-import folder, it reads all json files and creates a database with the name of the folder.
  2. For each json file, it creates a collection with the name of the file and persists all json objects contained in the file.

When we run this script, we can check if data is persited searching in logs.

MongoInitLog1MongoInitLog2

Note: The json file must contain an array of objects in json format.

Dockerized mongo

So that we do not have to have installed mongo in our laptop, we can dockerize mongo and only use it when it is necessary and to be able to export all our technology stack easily.

We only have to search docker image and pull from the repository.

docker pull mongo:latest

DockerPullImage

Mongo client

Mongo Client is a web interface that allows us to visualize in a simple way the contents of our collections.

We only have to search docker image and pull from the repository.

We do not need to pull the image, when we run the docker compose this will download all the images that are not founded in our local repository.

Run all with a single command.

If we wanted to run our application, with mongodb, with the imported data and with mongo client we would need to execute the 4 containers in the following order:

  1. Mongo
  2. Mongo Import
  3. Mongo Client
  4. App

Running 4 commands every time we make a change is not very useful and often causes bugs.

To solve this problem, we have the docker compose tool that allows us to execute several containers of the same stack and create links between the different containers so that they have visibility between them.

version: "2.1"
   services:
      mongo:
         image: mongo:3.2.4
         ports:
            - 27017:27017
         command: --smallfiles

      mongo-init:
         build: ./mongo-init
         links:
            - mongo

      mongo-client:
         image: mongoclient/mongoclient
         ports:
            - 3000:3000
         environment:
            - MONGOCLIENT_DEFAULT_CONNECTION_URL=mongodb://mongo:27017
         links:
            - mongo

# APP ************************************************************
      spring-boot-mongo-docker:
         image: davromalc/spring-boot-mongo-docker
         ports:
            - 8080:8080
         links:
            - mongo
         entrypoint: "java -Djava.security.egd=file:/dev/./urandom -jar /app.jar"

We are going to inspect the contents of this file:

  1. Services means each container we will run
  2. Mongo: We are going to use mongo image and expose its tipically port: 27017
  3. Mongo Init:  Build from Dockerfile . Copy the script into the container and run it. It have a link with mongo container. This link is very importante so if this link does not exist, the data would not persist in the desired mongo.
  4. Mongo Client:  From latest docker i :Dmage. The url of the mongo to which it accedes must be configured through environment. As in the application.yml file we must indicate the url with «mongo» and not with «localhost». And why mongo? Because mongo is the name of the mongo service declared in line 3. If in line 3 we would have declared the service as my-mongo-database, in this environment variable we should put: mongodb://my-mongo-database:27017 and the same in the application.yml file.
  5. App: From the image created above. We expose 8080 port. We set a link with mongo. If we doesn’t set this link, our app would nott run.

At this point, we can run the 4 containers with a single command, as we promised at the beginning of this article. 😀

We should to run the following command:

docker-compose -up


Each container has been executed successfully and we  can’t see errors in logs.

Note: If we modify the dataset of mongo init, we hace yo re-build the docker-image. For that purpouse, we hace to run the following command:

docker-compose up --build

Now, We can check if all configuration is fine and if we can access mongo data from mongo client and from our application.

Mongo Client:

Our Application:

AppGetCustomers

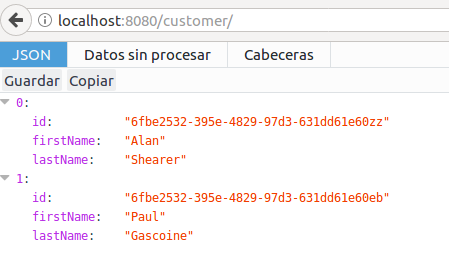
Calling Rest Controller

AppGetData2Logs output

AppCreateCustomer1

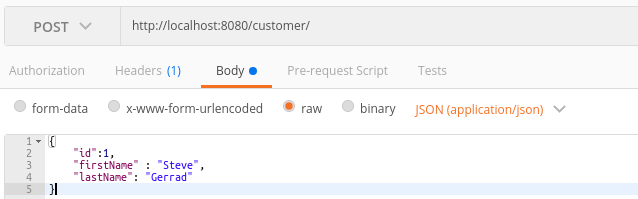
Create customer with postman tool

AppCreateCustomer2

Logs output

AppCreateCustomer3

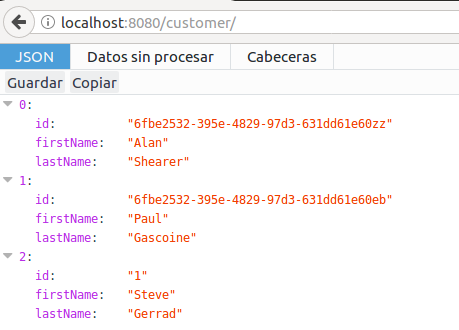
Now, we can check if customer has been persisted successfully.

Conclusion

Thanks to the docker-compose tool we can build a poweful technological stack that helps us develop and build spring boot applications in a simple and intuitive way.

Mongo client and mongo import data are two useful tools for development that allow us to speed up the development of our application and have an clean dataset every time we run the application. This is very helpful to run the integration tests for example.

The full source code for this article is available over on GitHub.


Integración continua con Jenkins Pipeline

Desde principios de 2017, estoy inculcando en mi empresa la importancia y la necesidad de tener un entorno de CI consolidado. Empecé instalando un Jenkins en un pequeño servidor perdido y ahora mismo he conseguido un proyecto para implantar integración continúa dentro de todos los equipos de desarrollo que hay.

En este post me gustaría plasmar muchos de los conocimientos adquiridos.

Definición del Workflow

En primer lugar, hemos definido un Workflow por el que tendrán que pasar todos los proyectos para asegurarnos en todo momento  que esos proyectos cuentan con la calidad necesaria y además para realizar despliegues automáticos en pre-producción y producción.

Os muestro un esquema general del workflow propuesto:


Workflow

Como resumen rápido, los pasos del workflow serían:

  1. Descargar el código
  2. Compilar
  3. Ejecutar los tests
  4. Realizar un análisis de calidad de código, comprobar la cobertura y análisis de seguridad.
  5. Despliegue en pre-producción
  6. Confirmación por parte humana.
  7. Realizar un tag del código
  8. Despliegue en producción
  9. Notificar cambios en JIRA

Implementación del Workflow

Para implementar este workflow de integración continúa, creo que la herramienta Jenkins en su versión 2 es la herramienta perfecta para ello ya que permite crear «Pipelines» o workflows con ficheros en lenguaje groovy con todas las ventajas que eso tiene.

Así que me puse manos a la obra y empecé a trabajar con Jenkins Pipeline  no sin darme algún que otro quebradero de cabeza.

Elegí Maven como herramienta principal ya que con diferentes plugins me permite realizar la mayoría de las acciones del workflow. También podría haber utilizado los plugins de Jenkins pero no todos están actualizados para dar soporte de pipeline.

Adjunto pipeline desarrollado.

#!groovy

pipeline {
     agent any    //Agente de Docker, de momento no utilizo Docker
     tools { //Alias a herramientas instaladas en Jenkins
        maven 'M3' //M3 es el nombre que le puse al maven instalado para Jenkins
        jdk 'JDK8' //JDK8 es el nombre que le puse al java de Jenkins
    }
    options {
        //Si en 3 días no ha terminado que falle.
        timeout(time: 76, unit: 'HOURS') 
    }
    environment {
        //variable con el nombre del proyecto
        APP_NAME = 'My-App'
    }
    stages { //Inicio fases del workflow
       stage ('Initialize') { //Primer paso, notificar inicio workflow
             steps {
                  slackSend (message: 'Inicio ejecucion ' + APP_NAME, channel: '#jenkins', color: '#0000FF', teamDomain: 'my-company', token: 'XXXXXXXXXXXXXXXXXXX' )
                  hipchatSend (color: 'GRAY', failOnError: true, notify: true, message: 'Inicio ejecucion ' + APP_NAME + ' <a href="${BLUE_OCEAN_URL}">Enlace a la ejecuci\u00F3n</a>', v2enabled: true,  room: 'Jenkins' )
            }
       }
       stage ('Build') { //Compilamos el proyecto
            steps {
                 bat "mvn -T 4 -B --batch-mode -V -U -e -Dmaven.test.failure.ignore clean package -Dmaven.test.skip=true"
            }
       }
       stage ('Test') {
            //Fase de tests. En paralelo tests automaticos y de rendimiento
            steps {
                 parallel 'Integration & Unit Tests': {
                     bat "mvn -T 4 -B --batch-mode -V -U -e test"
                 }, 'Performance Test': {
                     bat "mvn jmeter:jmeter"
                 }
           }
       }
       stage ('QA') {
       //Fase de QA. En paralelo Sonar, Cobertura y OWASP
           steps {
                parallel 'Sonarqube Analysis': {
                    //Si quieres ver la cobertura en sonar es necesario ejecutar cobertura y después sonar
                    bat "mvn -B --batch-mode -V -U -e org.jacoco:jacoco-maven-plugin:prepare-agent install -Dmaven.test.failure.ignore=true"
                    bat "mvn -B --batch-mode -V -U -e sonar:sonar"
                    echo 'Sonarqube Analysis'
               }, 'Cobertura code coverage' : {
                    //Realizamos análisis de cobertura de código
                    //Si la cobertura de código es inferior al 80% falla la ejecución y falla el workflow
                    bat "mvn -B --batch-mode -V -U -e verify"
               }, 'OWASP Analysis' : {
                    bat "mvn -B -X --batch-mode -V -U -e dependency-check:check"
               }
          }
          //Tras ejecutar los pasos en paralelos guardo el reporte de tests
          post {
               success {
                    junit 'target/surefire-reports/**/*.xml' 
               }
          }
      }
      stage ('Deploy to Pre-production environment') {
      //Desplegamos en el entorno de Pre-Producción
      //Se despliega en un tomcat con el plugin Cargo
           steps {
                bat "mvn -B -P Desarrollo --batch-mode -V -U -e clean package cargo:redeploy -Dmaven.test.skip=true"
           }
      }
      stage ('Confirmation') {
      //En esta fase esperamos hasta que la persona configurada confirme que desea subir a Producción. 
      //Tiene 72 horas para confirmar la subida a Producción.
      //Se envían notificaciones para que la persona tenga constancia
           steps {
                slackSend channel: '@dromeroa',color: '#00FF00', message: '\u00BFDeseas subir a produccion?. \n Confirma en la siguiente web: ${BLUE_OCEAN_URL}' , teamDomain: 'my-company', token: 'XXXXXXXXXXX'
                hipchatSend (color: 'YELLOW', failOnError: true, notify: true, message: '\u00BFDeseas subir a producci\u00F3n\u003F. \n Confirma en el siguiente <a href="${BLUE_OCEAN_URL}">Enlace</a>', textFormat: true, v2enabled: true, room: 'Jenkins')
                timeout(time: 72, unit: 'HOURS') {
                    input '\u00BFContinuar con despliegue en producci\u00F3n\u003F'
                }
           }
      }
      stage ('Tagging the release candidate') {
           //Realizamos un tag en SVN del código fuente
           steps {
               //Tagging from trunk to tag
               echo "Tagging the release Candidate";
               bat "mvn -B --batch-mode -V -U -e scm:tag -Dmaven.test.skip=true"
          }
      }
      stage ('Deploy to Production environment') {
           //Comenzamos a subir a producción en los dos servidores 
           steps {
                parallel 'Server 1': {
                    //Necesitamos realizar reintentos ya que falla la subida en remoto y se producen colisiones
                    retry(6) {
                        bat "mvn -T 4 -B -P Produccion --batch-mode -V -U -e tomcat7:redeploy -Dmaven.test.skip=true"
                    }
                }, 'Server 2' : {
                    retry(6) {
                        bat "mvn -T 4 -B -P Produccion --batch-mode -V -U -e tomcat:redeploy -Dmaven.test.skip=true"
                    }
                }
           }
      }
      stage ('CleanUp') {
      //Limpiamos el workspace para no llenar los discos
           steps {
                deleteDir()
           }
      }
    } //Fin de las fases del workflow
    //Inicio de acciones post ejecución del workflow
    //Notificamos como ha sido la ejecución del workflow
    post {
      success {
           slackSend channel: '#jenkins',color: '#00FF00', message: APP_NAME + ' ejecutado satisfactoriamente.', teamDomain: 'my-company', token: 'XXXXXXXXXXXXXXXXXXXX'
           hipchatSend (color: 'GREEN', failOnError: true, notify: true, message: APP_NAME + ' ejecutado satisfactoriamente. <a href="${BLUE_OCEAN_URL}">Enlace a la ejecuci\u00F3n</a>', textFormat: true, v2enabled: true, room: 'Jenkins')
      }
      failure {
           slackSend channel: '#jenkins',color: '#FF0000', message: APP_NAME + ' se encuentra en estado fallido. ${BLUE_OCEAN_URL}', teamDomain: 'my-company', token: 'XXXXXXXXXXXXXXXX'
           hipchatSend (color: 'RED', failOnError: true, notify: true, message: APP_NAME + ' se encuentra en estado fallido. <a href="${BLUE_OCEAN_URL}">Enlace a la ejecuci\u00F3n</a>', textFormat: true, v2enabled: true, room: 'Jenkins')
      }
      unstable {
           slackSend channel: '#jenkins',color: '#FFFF00', message: APP_NAME + ' se encuentra en estado inestable. ${BLUE_OCEAN_URL}', teamDomain: 'my-company', token: 'XXXXXXXXXXXXXXXXXXXX'
           hipchatSend (color: 'RED', failOnError: true, notify: true, message: APP_NAME + ' se encuentra en estado inestable. <a href="${BLUE_OCEAN_URL}">Enlace a la ejecuci\u00F3n</a>', textFormat: true, v2enabled: true, room: 'Jenkins')
      }
    }
   }

Se puede comprobar que el workflow permite automatizar un montón de tareas que el desarrollador tendría que realizar en lugar de dedicarse a desarrollar, y además dichas tareas son susceptibles a fallos, con lo cuál eliminamos esa posibilidad.  También podemos imponer una serie de reglas de calidad en el código que han de ser cumplidas si se quiere realizar un despliegue de una nueva versión.

A continuación, muestro como se ve en Jenkins una ejecución del Workflow en Jenkins. Nuestro Jenkins tiene instalado el plugin Blue Ocean que cambia la interfaz de Jenkins.

Workflow2

Próximos pasos:

  • Integrar con Docker
  • Integrar con Ansible para realizar puestas en producción de Artefactos JAR
  • Integrar con JIRA para notificar al cliente que se ha desplegado una nueva versión.

En próximos artículos mostraré como han ido las próximas integraciones y como realizarlas.

Este post muestra una visión rápida y a «grosso modo» de como se ha realizado el proceso de instaurar una política de integración continua. Quedarían detalles por explicar como la configuración de los plugins de Maven o la instalación de Jenkins.

Finalizo este post invitando a cualquier persona que tenga alguna duda a dejar un comentario para que pueda ayudar en la medida de lo posible. 🙂

Enlaces de interés:

Objetivos para 2017

Ayer 1 de Enero de 2017 leí como cada domingo, desde hace más de 6 meses, la Bonilista  y la verdad, es que me hizo pensar que yo también debería hacer una lista con mis objetivos para el nuevo año, y a la vez analizar como ha ido el 2016 ya que necesito saber como ha ido el año para saber si voy por el buen camino o si he perdido el rumbo.

Allá vamos con mi resumen del 2016.

A nivel profesional ha sido un año muy bueno debido a mi gran progresión en mi empresa actual en la que llevo actualmente 1 año y medio. He aprendido muchísimo, he programado todo lo que he querido y más, he introducido nuevas tecnologías en la empresa, he introducido nuevos conceptos necesarios en una software factory y lo más importante he sido feliz. Por el contrario, he sufrido bastante estrés por alta carga de trabajo y por no saber desconectar del trabajo.

A nivel personal, la verdad es que he conseguido pocos hitos, principalmente por estar muy centrado en mi vida profesional.

  • No he conseguido obtener una certificación en Inglés, es decir, tengo que aprender inglés en serio.
  • No he conseguido llevar una vida más sana.
  • He olvidado un poco mi familia y pareja.
  • No he publicado nada en este Blog.

Viendo como ha ido el 2016, estos son mis objetivos para el 2017.

  1. Trabajar desde casa un día a la semana. Este objetivo creo que es importante ya que trabajar desde casa me aporta trabajar a mi ritmo, con mis horarios y centrado al 100% en el trabajo, por lo tanto me aporta felicidad. Creo que se puede conseguir ya que la empresa está facilitando esta posibilidad y por tanto es algo que debo de aprovechar.
  2. Aprender a desconectar del trabajo. Un gran lastre que me obsesiona desde que empezé a trabajar. Si no consigo terminar algo que estoy haciendo, o descubro algo que se puede mejorar, me llevo horas y horas dandole vueltas a la cabeza en mi tiempo libre, lo cual no es bueno ya que no desconecto y me siento más cansado, estresado y consecuentemente más irascible.
  3. Llevar una vida más saludable. Debido al alto nivel de estrés sufrido en 2016, la alimentación y la salud no ha sido una prioridad para mí desembocando en estados de ansiedad y en llevar una alimentación en ocasiones nefasta. Esto no puede ocurrir en 2017 y debo poner muchos medios en ello.
  4. Aprender inglés en serio. Hoy en día no puedo permitirme el lujo de no saber inglés a un nivel alto. No hay excusas y hay que ponerle remedio. Sin más. Si consigo este objetivo obtendré facilmente una certificación oficial, así que manos a la obra.
  5. Asistir a conferencias, charlas y eventos relacionados con el software.  Este 2016 he seguido desde Twitter, con mucha envidia, muchos eventos relacionados con el mundillo del software tales como tarugoconf, codemotion, sevilla-jam, agile spain, etc… Si quiero seguir aprendiendo y creciendo en este mundillo debo aprender de los mejores y está claro que los mejores están en esos eventos.

Sinceramente se me ocurren hasta 5 o 6 objetivos más pero creo que debo ser realista y centrarme en lo más importante para poder cumplir todos los objetivos.

Vamos a lío que ya llevo un día de retraso 🙂

Registro de histórico para tus entidades con JPA, MongoDB y Spring

  1. Resumen   

    En mi breve experiencia profesional he detectado un problema en la gran mayoría de las aplicaciones. No disponer de una forma sencilla de una traza sobre una entidad persistida en base de datos. Es decir, un histórico sobre las acciones llevabas a cabo sobre una entidad de nuestra aplicación.

    Leyendo uno de los grandes blogs sobre el ecosistema J2EE, Baeldung, descubría las posibilidades que ofrecían las anotaciones de JPA @PreInsert , @PreUpdate, etc…

    Estas anotaciones me llevaron a la idea de montar un histórico en una colección de MongoDB para tener controlado cualquier cambio que se realice en cualquier aplicación que desarrolle.

  1. Configuración

En primer lugar, vamos a crear el Datasource para nuestra base de datos Mongo que en esta ocasión se encuentra en nuestro local. Para ello vamos a utilizar la configuración basada en Java.

En primer lugar, crearemos la configuración para nuestra base de datos mongo.

@Configuration
@EnableMongoRepositories
public class DbConfigHistoricos extends AbstractMongoConfiguration {


	@Override
	protected String getDatabaseName() {
		return "historicos";
	}

	@Override
	public Mongo mongo() throws Exception {
		MongoClient client = new MongoClient("localhost");
		return client;
	}

	@Bean
	public MongoTemplate mongoTemplate() throws Exception {
		return new MongoTemplate(mongo(), "historicos");
	}

	@Override
	protected String getMappingBasePackage() {
		return "com.david.tutoriales.model";
	}
}

Esta configuración especifica las siguientes propiedades:

  • Base de datos con nombre «historicos»
  • La base de datos está alojada en mi propio equipo. localhost
  • El paquete en el cual está situada nuestra única colección es: com.david.tutoriales.model

A continuación importaremos nuestra nueva configuración a la configuración global de la aplicación.

@EnableWebMvc
@Configuration
@ComponentScan({ "com.david.tutoriales.*" })
@Import({ SecurityConfig.class , DbConfig.class, DbConfigHistoricos.class })
/**
 * @author David
 *
 */
public class AppConfig
		extends
	org.springframework.web.servlet.config.annotation.WebMvcConfigurerAdapter {

//omitido...
}

Ya tenemos nuestra base de datos mongo configurada, ahora nos queda lo importante, guardar un histórico sobre cada entidad.

Se ha definido dos controles sobre el histórico de una entidad:

  • Establecer una fecha y un usuario que realiza la acción para antes de realizar alguna acción.
@MappedSuperclass
@Inheritance(strategy = InheritanceType.SINGLE_TABLE)
public class Entidad {

	@Version
	private long version;
	
	@Id
	@GeneratedValue(strategy=GenerationType.AUTO)
	private Long Id;
	
	private String usuarioInsercion;

	private String usuarioModificacion;
	
	private String usuarioBorrado;
	
	private LocalDateTime fechaInsercion;
	
	private LocalDateTime fechaBorrado;
	
	private LocalDateTime fechaModificacion;

        //getters y setters omitidos
}

Utilizamos una entidad común a muchos proyectos para completar el ejemplo…

@Entity(name="usuarios")
@EntityListeners(value=HistoricoListener.class)
public class Usuario extends Entidad {
      //....
}

En la entidad Usuario hemos definido el listener que será disparado cada vez que se realice una acción CRUD sobre una instancia de la entidad.
A continuación podemos ver el Listener con las etiquetas del tipo @Pre…

@Service
public class HistoricoListener {

	@PrePersist
	void onPrePersist(E entidad) {
		entidad.setFechaInsercion(LocalDateTime.now());
		entidad.setUsuarioInsercion(SecurityContextHolder.getContext()
				.getAuthentication().getName());
	}

	@PreUpdate
	void onPreUpdate(E entidad) {
		entidad.setFechaModificacion(LocalDateTime.now());
		entidad.setUsuarioModificacion(SecurityContextHolder.getContext()
				.getAuthentication().getName());
	}

	@PreRemove
	void onPreRemove(E entidad) {
		entidad.setFechaBorrado(LocalDateTime.now());
		entidad.setUsuarioBorrado(SecurityContextHolder.getContext()
				.getAuthentication().getName());
	}
  • Guardar en la base de datos Mongo la entidad, la operación, la fecha y la hora del usuario que realiza la acción.

Para ello hemos definido la siguiente colección de Mongo

@Document(collection="historico")
public class Historico {

@Id
private String id;
@DateTimeFormat(iso = ISO.DATE_TIME)
private LocalDateTime date;

private String usuarioEjecutor;

private CRUD accion;

private E entidad;

private String className;

//getters y setters omitidos
}

En el Listener definido en la sección superior se ha definido que se realice una inserción de esta colección para cada acción del tipo @Post…

@Service
public class HistoricoListener {

// For Annotation
ApplicationContext ctx = new AnnotationConfigApplicationContext(
DbConfigHistoricos.class);
MongoOperations mongoOperation = (MongoOperations) ctx
.getBean("mongoTemplate");

@PostPersist
void onPostPersist(E entidad) {
persistirHistorico(CRUD.CREATE, entidad);
}

@PostLoad
void onPostLoad(E entidad) {
persistirHistorico(CRUD.READ, entidad);
}

@PostUpdate
void onPostUpdate(E entidad) {
persistirHistorico(CRUD.UPDATE, entidad);
}

@PostRemove
void onPostRemove(E entidad) {
persistirHistorico(CRUD.DELETE, entidad);
}

private void persistirHistorico(CRUD accion, E entidad) {
Historico his = new Historico(LocalDateTime.now(),
SecurityContextHolder.getContext().getAuthentication()
.getName(), accion, entidad);
mongoOperation.save(his);
}
}

NOTA:La clase de Java 8 LocalDateTime no se persiste automáticamente a base de datos. Por lo tanto debemos establecer un Converter de la siguiente forma:

@Converter(autoApply = true)
public class LocalDateTimePersistenceConverter implements
AttributeConverter<LocalDateTime,java.sql.Timestamp> {
@Override
public java.sql.Timestamp convertToDatabaseColumn(LocalDateTime entityValue) {
if (entityValue != null){
return Timestamp.valueOf(entityValue);
}else{
return null;
}
}

@Override
public LocalDateTime convertToEntityAttribute(java.sql.Timestamp databaseValue) {
if (databaseValue != null){
return databaseValue.toLocalDateTime();
}else{
return null;
}
}
}
  1. Tests

Como no podía de ser de otra forma, este código hay que probarlo, y para ello se ha creado un pequeño test de junit y que nos permita ver el resultado del proceso y comprobar que nuestra idea se ha ejecutado a la perfección.

@Test
public void test(){
UserDetails credentilas = new User("DAVROMALC", "PASSWORD", new ArrayList(0));
Authentication auth = new UsernamePasswordAuthenticationToken("DAVROMALC", credentilas);
SecurityContextHolder.getContext().setAuthentication(auth);
Usuario user = new Usuario();
user.setUsername("DAVROMALC");
user = service.save(user);
List historico = mongoTemplate.findAll(Historico.class,"historico");
Assert.assertTrue(!historico.isEmpty());

for (Historico<?> his : historico){
System.out.println(his);
}
}

@Test()
public void testCargar(){
UserDetails credentilas = new User("DAVROMALC", "PASSWORD", new ArrayList(0));
Authentication auth = new UsernamePasswordAuthenticationToken("DAVROMALC", credentilas);
SecurityContextHolder.getContext().setAuthentication(auth);
Usuario user = new Usuario();
user.setUsername("DAVROMALC");
user = service.save(user);
user = service.load(user.getId());
List historico = mongoTemplate.findAll(Historico.class,"historico");
Assert.assertTrue(!historico.isEmpty());

for (Historico<?> his : historico){
System.out.println(his);
}
}

@Test()
public void testModificar(){
UserDetails credentilas = new User("DAVROMALC", "PASSWORD", new ArrayList(0));
Authentication auth = new UsernamePasswordAuthenticationToken("DAVROMALC", credentilas);
SecurityContextHolder.getContext().setAuthentication(auth);
Usuario user = new Usuario();
user.setUsername("DAVROMALC");
user = service.save(user);
user = service.load(user.getId());
user.setUsername("DAVROMALC2");
user = service.save(user);
List historico = mongoTemplate.findAll(Historico.class,"historico");
Assert.assertTrue(!historico.isEmpty());

for (Historico<?> his : historico){
System.out.println(his);
}
}

@Test()
public void testEliminar(){
UserDetails credentilas = new User("DAVROMALC", "PASSWORD", new ArrayList(0));
Authentication auth = new UsernamePasswordAuthenticationToken("DAVROMALC", credentilas);
SecurityContextHolder.getContext().setAuthentication(auth);
Usuario user = new Usuario();
user.setUsername("DAVROMALC");
user = service.save(user);
service.delete(user);
List historico = mongoTemplate.findAll(Historico.class,"historico");
Assert.assertTrue(!historico.isEmpty());

for (Historico<?> his : historico){
System.out.println(his);
}
}

En la siguiente imagen podemos ver el resultado de los test.

Pruebas Realizadas

Nota: El código completo está disponible en GitHub

Métricas para tu aplicación Spring

1. Resumen

En este Post he querido mostrar como añadir métricas a una aplicación web construida con Spring.

Para ello utilizaré los filtros de Spring y MongoDB para persistir estas métricas.

2. Establecer el filtro

En este tutorial se ha utilizado Java Config de Spring 4 por ello no disponemos de web.xml. En su lugar tenemos una clase que extiende de AbstractAnnotationConfigDispatcherServletInitializer

public class SpringMvcInitializer extends AbstractAnnotationConfigDispatcherServletInitializer {

@Override
protected Class<?>[] getRootConfigClasses() {
return new Class[] { AppConfig.class };
}

@Override
protected Class<?>[] getServletConfigClasses() {
return null;
}

@Override
protected String[] getServletMappings() {
return new String[] { "/" };
}

@Override
public void onStartup(ServletContext servletContext)
throws ServletException {
servletContext
.addFilter("metricFilter",
new MetricFilter())
.addMappingForUrlPatterns(null, false, "/*");
RequestContextListener listener = new RequestContextListener();
servletContext.addListener(listener);
super.onStartup(servletContext);
}
}

Una vez que hayamos establecido el filtro, debemos crear el filtro en sí. Vamos a crear la clase MetricFilter

public class MetricFilter implements Filter {
	 
    private MetricService metricService;
 
    @Override
    public void init(FilterConfig config) throws ServletException {
        metricService = (MetricService) WebApplicationContextUtils
         .getRequiredWebApplicationContext(config.getServletContext())
         .getBean("metricService");
    }
 
    @Override
    public void doFilter(ServletRequest request, ServletResponse response, FilterChain chain) 
      throws java.io.IOException, ServletException {
        try{
        	chain.doFilter(request, response);
        	metricService.saveMetrics( (HttpServletRequest) request, (HttpServletResponse) response);
        	//Si hay algun fallo no paramos la aplicacion. Las metricas son secundarias.
        }catch(Exception e ){
        	log.error(e);
        }
    }

    @Override
    public void destroy() {
	metricService = null;
    }
}

En esta clase el método importante que debemos sobreescribir es doFilter ya que es el encargado de filtrar la Request y la Response de una petición Http. Se puede observar que si es lanzada alguna exception solo se muestra en el log ya que no es óptimo parar la aplicación por las métricas.

3. Persistir las métricas

Una vez que tengamos capturadas las métricas nos interesa persistirlas para tener la mayor información posible sobre nuestra aplicación. Para ello, primero creamos la configuración relativa a la persistencia.

@Configuration
@EnableMongoRepositories
public class DbConfigMetricas extends AbstractMongoConfiguration {

	@Override
	protected String getDatabaseName() {
		return "metricas";
	}

	@Override
	public Mongo mongo() throws Exception {
		return new MongoClient("localhost");
	}

	@Bean
	public MongoTemplate mongoTemplate() throws Exception {
		return new MongoTemplate(mongo(), "metricas");
	}

	@Override
	protected String getMappingBasePackage() {
		return "com.p.model.metricas";
	}
	
}

En esta clase estamos indicando a Spring que tenemos una base de datos MongoDB establecida en localhost, denominada «metricas» y que el «package» en el que se encuentran las colecciones de Mongo está situado en «com.p.model.metricas».

Esta clase debe ser importada en nuestra clase principal de Configuración

@EnableWebMvc
@Configuration
@ComponentScan({ "com.p.*" })
@Import({ SecurityConfig.class , DbConfig.class, DbConfigMetricas.class })
public class AppConfig
		extends
		org.springframework.web.servlet.config.annotation.WebMvcConfigurerAdapter {

}

Una vez que tengamos la configuración establecida, pasaremos a persitir una métrica. Aunque se pueden guardar multitud de métricas (Visitantes únicos, Peticiones a recursos, Peticiones Ajax, Errores, Navegadores, etc) en este ejemplo veremos que porcentaje de usuarios acceden a nuestra web a través de un dispositivo móvil o a través de equipos de escritorio.

Para ello crearemos una collection en MongoDB con estos parámetros.

@Document(collection = "userAgent")
public class MetricaHttpUserAgent {

	@Id
	private String id;
	private String os;
	private String browser;
	private Date fecha;
	private Integer count;

        //Setters y Getters ocultos

Una vez creada la colección solo debemos persistir en el servicio de métricas cada vez que se realize una petición de que navegador proviene.

@Service
public class MetricService {

	// For Annotation
	ApplicationContext ctx = new AnnotationConfigApplicationContext(
			DbConfigMetricas.class);
	MongoOperations mongoOperation = (MongoOperations) ctx
			.getBean("mongoTemplate");

	@Transactional()
	public void saveMetrics(HttpServletRequest request,
			HttpServletResponse response) {
                try {
			HttpServletRequest httpRequest = ((HttpServletRequest) request);
			String browserDetails = httpRequest.getHeader("User-Agent");
			String userAgent = browserDetails;
			String user = userAgent.toLowerCase();

			String os = SystemUtil.getOs(userAgent);
			String browser = SystemUtil.getBrowser(userAgent, user);
                        //Others metrics...
			manageHttpUserAgent(os, browser);
                        //Others metrics...
		} catch (Exception e) {
			log.error(e);
		}
        }
        protected void manageHttpUserAgent(String os, String browser) {
		try {
			// find
			Query query = new Query();
			Date current = new Date(System.currentTimeMillis());
			String inicioDia = sdf.format(current);
			DateTimeFormatter formatter = DateTimeFormatter
					.ofPattern(METRIC_DATE_PATTERN);
			LocalDateTime inicioDiaDate = LocalDateTime.parse(inicioDia
					+ METRIC_HOUR_PATTERN, formatter);
			LocalDateTime finDiaDate = inicioDiaDate.plusHours(23)
					.plusMinutes(59).plusSeconds(59);
			Date fin = Date.from(finDiaDate.toInstant(ZoneOffset.UTC));
			Date inicio = Date.from(inicioDiaDate.toInstant(ZoneOffset.UTC));
			query.addCriteria(Criteria
					.where("os")
					.is(os)
					.andOperator(
					Criteria.where("browser").is(browser).and(METRIC_ATTRIBUTE_FECHA)
									.gte(inicio).lte(fin)));
			MetricaHttpUserAgent metrica = mongoOperation.findOne(query,
					MetricaHttpUserAgent.class, "userAgent");
			if (metrica == null || metrica.getId() == null
					|| metrica.getId().isEmpty()) {
				metrica = new MetricaHttpUserAgent();
				metrica.setCount(1);
				metrica.setBrowser(browser);
				metrica.setOs(os);
				metrica.setFecha(current);
				mongoOperation.save(metrica, "userAgent");
			} else {
				mongoOperation.updateFirst(query,
						Update.update(METRIC_ATTRIBUTE_COUNT, metrica.getCount() + 1),
						MetricaHttpUserAgent.class);
			}
		} catch (Exception e) {
			log.error(e);
		}
	}

En esta clase el disponemos de dos métodos, el primero se encargar de dividir las diferentes métricas y el segundo encargado de gestionar las métricas del navegador y el S.O.

Quizás lo más completo esté en el segundo método:

manageHttpUserAgent(String os, String browser)

En este método realizamos una consulta para obtener el número de veces que en el día actual del sistema se ha accedido con el navegador y el sistema operativo recibido como parámetro. Si en ese día no se ha accedido con ese S.O. y con ese navegador se persiste un nuevo objeto, en caso contrario se aumenta en una unidad el contador.

4. Visualización de las métricas

Una vez que se persistan las métricas es interesante que se puedan mostrar de una forma rápida e intuitiva. En nuestro ejemplo mostraremos una gráfica en la cuál un usuario administrador podrá ver que porcentaje de usuarios acceden a la web a través de Móvil o a través de Escritorio.

Para ello se ha creado un servicio que consulte al MongoDB para tratar las métricas persistidas.

@Service
public class MetricStadisticsService {

	private static final String OS_IPHONE = "IPhone";
	private static final String OS_ANDROID = "Android";
	private static final String OS_UNIX = "Unix";
	private static final String OS_MAC = "Mac";
	private static final String OS_WINDOWS = "Windows";

	// For Annotation
	ApplicationContext ctx = new AnnotationConfigApplicationContext(
			DbConfigMetricas.class);
	MongoOperations mongoOperation = (MongoOperations) ctx
			.getBean("mongoTemplate");

	@Transactional(readOnly = true)
	public Pair<Integer, Integer> getSystemStadistics() {
		Pair<Integer, Integer> pair = Pair.create(0, 0);
		AggregationOperation group = Aggregation.group("id").sum("count")
				.as("count");
		Aggregation aggregation = Aggregation.newAggregation(group);
		AggregationResults result = mongoOperation.aggregate(
				aggregation, "userAgent", DBObject.class);
		if (result.getUniqueMappedResult() != null) {
			int allRequest = Integer.parseInt(result.getUniqueMappedResult()
					.get("count").toString());

			AggregationOperation match = Aggregation.match(Criteria.where("os")
					.regex("^" + OS_WINDOWS + "|" + OS_MAC + "|" + OS_UNIX
							+ "$"));
			group = Aggregation.group("id").sum("count").as("count");
			aggregation = Aggregation.newAggregation(match, group);
			result = mongoOperation.aggregate(aggregation, "userAgent",
					DBObject.class);
			int desktopRequest = 0;
			if (result.getUniqueMappedResult() != null) {
				desktopRequest = Integer.parseInt(result
						.getUniqueMappedResult().get("count").toString());
			}

			match = Aggregation.match(Criteria.where("os").regex(
					"^" + OS_ANDROID + "|" + OS_IPHONE + "$"));
			group = Aggregation.group("id").sum("count").as("count");
			aggregation = Aggregation.newAggregation(match, group);
			result = mongoOperation.aggregate(aggregation, "userAgent",
					DBObject.class);
			int mobileRequest = 0;
			if (result.getUniqueMappedResult() != null) {
				mobileRequest = Integer.parseInt(result.getUniqueMappedResult()
						.get("count").toString());
			}

			Integer mobilePercentaje = (mobileRequest * 100) / allRequest;
			Integer desktopercentaje = (desktopRequest * 100) / allRequest;

			pair = Pair.create(mobilePercentaje, desktopercentaje);
		}
		return pair;
	}
}

Se puede observar en el código superior como se obtiene una tupla de enteros con el porcentaje de usuarios que acceden a través de dispósitivos móviles y a través de dispósitivos de escritorio. Para ello se consultan la suma del número de peticiones totales, la suma del número de peticiones realizadas desde Android o IPhone y por último la suma del número de peticiones realizadas desde Mac, Windows o Unix.

Tras esto se calcula el porcentaje y se muestra por pantalla. En la siguiente imagen podemos ver el resultado final.

Estadísticas Métricas

Todo el código de la aplicación con otras tantas métricas y más ejemplos de uso de Spring 4 en

Aplicación ejemplo construida en Spring 4